
What awaits you?
Today there is a lot about Kubernetes or OpenShift. This is not such an article. I started using containers in 2013, especially Docker, and in the beginning I used them mainly to isolate things and have reproducible builds. The same applies here; We build a container, push it on DockerHub for sharing and downloading docker run ... So do not expect crazy things to happen here.
If you have no prior knowledge of Docker, you should still be able to join. The Docker Engine in the Community version (under Linux) or the Desktop Docker (under MacOS and Windows) is quite sufficient.
In terms of C ++, I do not expect anything code-wise except that your project uses CMake and compiled with GCC gold clink,
introduction
I recently started a new job at Red Hat, where I get a chance to work on it LLDB Project. The first thing I noticed after not working with C ++ for a while was that slowness the compilation. I worked with walk for a few years, and compilation performance is no problem at all there. It just disappears from the picture.
Slow compilation
When I say that compiling was slow LLDB, I mean compiling the lldb The target (git tag: llvmorg-7.1.0) in the release mode takes almost two hours. Release builds are already the fastest to build a total of 7 or more variants of LLDB (clink/gccDebug / Release Asan/ no asan, assert / no assert, …) that makes the compile time a whole day.
My normal developer is a three year old Lenovo Thinkpad T460s Laptop on which I run Fedora 29 and the following tools:
- gcc (GCC) 8.2.1 20180801 (Red Hat 8.2.1-2)
- clink Version 7.0.1 (Fedora 7.0.1-6.fc29)
- ccache Version 3.4.2
- distcc 3.2rc1 x86_64-redhat-linux-gnu
When I compile LLDB on my development laptop make and four compilation jobs ( -j 4 ), the time Command reports this:
real    72m24,439s
user    224m32,731s
sys     12m2,094s
This means I have to wait two hours for one-time compilation.
Accelerate
If I compile LLDB on my cluster (laptop, desktop, iMac) ninja and 10 compile jobs (like from distcc -j ) the time Command reports this:
real    22m29,130s
user    49m16,726s
sys     4m27,407s
That means compiling with ninja and my distcc cluster is
- 3.22 times faster Real time.
- 4.56 times faster The total number of CPUs that the process performs in user mode.
- 2.7 times faster The number of CPU seconds that the process runs in kernel mode.
I hope that motivates you to read on.

Tip 1: Distribute the compile load
I experimented with acceleration possibilities distccThis option allows you to distribute your compilation jobs to other computers. This requires the same compiler installed on the computer as on the developer computer (the client).
So I installed a spare with Fedora 29 to include in my cluster compilation. I’ve installed all the right compilers running on my local machine.
But then I want this to be a nightmare. I did not want to trade slowness for complexity. Not to mention all the things I need to do when I upgrade my development system to Fedora 30. Do I really need to upgrade? all My worker machines in the cluster?
I also had an iMac on another desk, which does not work well if we do not edit or record videos. Could it be used for compilation? After all, macOS does not have exactly the same compilers that I have on my developer computer. This is what I meant in the introduction with a heterogeneous node cluster.
To get to the bottom of this page, click here.

Tip 2: Use a distcc server container
I mentioned earlier that I have an iMac, which is not important when working on my laptop. Would not it be nice if I could run a container on top of it (eg with Docker) that serves with the necessary already installed tools?
To better explain what I want to achieve, here is a diagram of my compile cluster architecture.
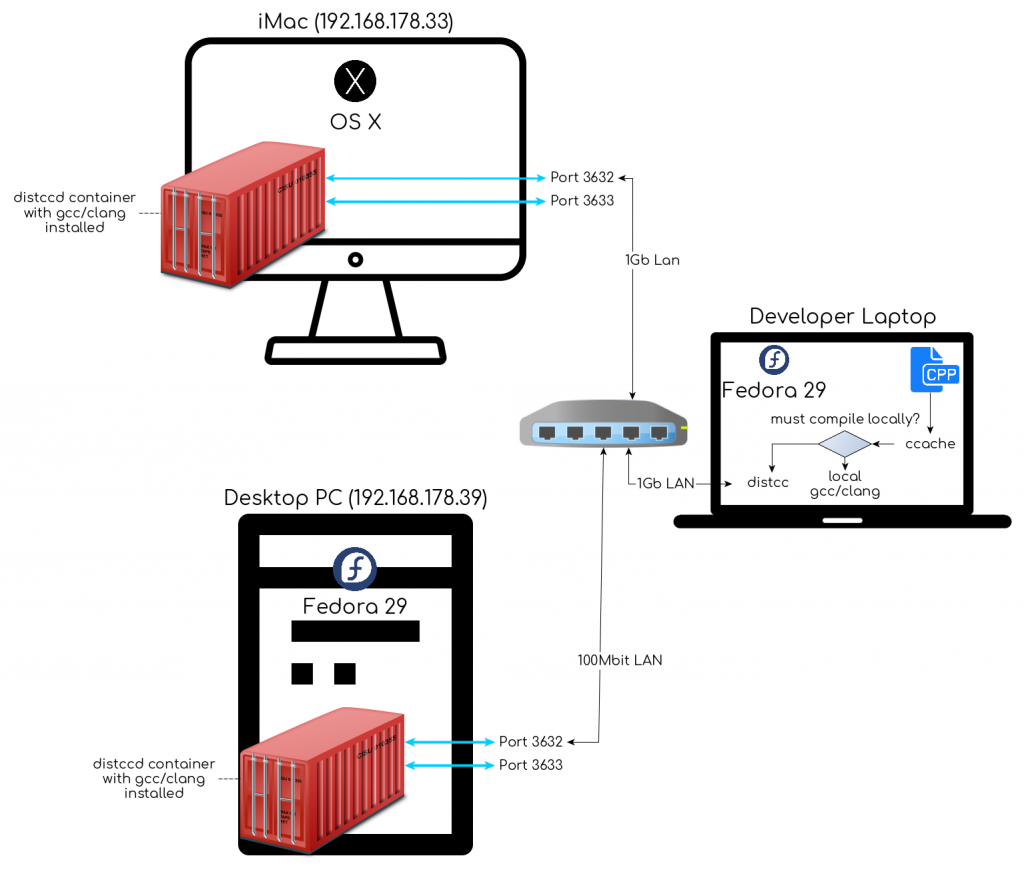
Diagram of my compilation cluster architecture.
It turns out that you can abstract (almost) completely from that docker run Command in a terminal.
Do not worry if you are unfamiliar with Docker. it’s easy. Remember this rough analogy:
- A dock worker image is like one program in Linux.
- A container is like one process a program under Linux, an instance of the program.
Obviously, the image must be present before the container can be present. To create a picture, write what means Dockerfile This describes the base image you want to start with. In my case, I want to be as close as possible to my developer, so I use that fedora:29 Image.
FROM fedora:29
Then install the tools that deliver your imageInstall tools):
RUN dnf install -y
    clang
    distcc
    distcc-server
    doxygen
    gcc
    graphviz
    htop
    libasan
    libasan-static
    libedit-devel
    libxml2-devel
    make
    ncurses-devel
    net-tools
    python-devel
    swig
   && yum clean all
NOTE: All the above are not required. I have my docker image installed. Of course, this is not necessary because distcc sees only preprocessed compilation units. This does not mean that they are transferred from my developer laptop to the server.
In a container docker, there can only be one top-level process that forms the heart of the container. In our case that’s the case distcc, We configure it with a so-called entry point and pass on all the flags we want to keep
ENTRYPOINT (
  "distccd",
  "--daemon",
  "--no-detach",
  "--user", "distcc",
  "--port", "3632",
  "--stats",
  "--stats-port", "3633",
  "--log-stderr",
  "--listen", "0.0.0.0"
)
If you do not understand any of the above flags, you can look them up man distccd,
Then there are the flags we care about
# By default the distcc server will accept clients from everywhere.
# Feel free to run the docker image with different values for the
# following params.
CMD (
  "--allow", "0.0.0.0/0",
  "--nice", "5",
  "--jobs", "5"
)
That’s essentially it. You can find the latest version of mine Dockerfile here,
To create the Docker image from the Docker file
Please note that I have configured a repository on DockerHub automatically the latest version of my Dockerfile Image. Instead of creating the image yourself, you can also download the latest version:
$ docker pull konradkleine/distcc:fedora29
If you want to experiment, you can create the image as follows:
$ git clone git@github.com:kwk/distcc-docker-images.git
$ cd distcc-docker-images
$ docker build -t konradkleine/distcc:fedora29 -f Dockerfile.fedora29 .
To run the Docker image
To include a Linux, MacOS, or Windows computer in your cluster, you must have Docker installed and properly configured on that computer. Then go to the following command:
$ docker run
  -p 3632:3632
  -p 3633:3633
  -d
  konradkleine/distcc:fedora29
This will download (a.k.a. pullover) my latest distcc docker image (if not yet downloaded) and start it in daemon mode ( -d ). This will expose the handport from distcc ( 3632 ) and the HTTP statistic port of distcc ( 3633 ) under the same numbers on the host machine.
To test the Docker image
The beauty of Docker for me is that you can always use your machine to try it out. Docker commands for your Docker commands for your local host.
$ docker run
  -p 3632:3632
  -p 3633:3633
  -d
  --name localdistcc
  konradkleine/distcc:fedora29
Then I suggest to run htopIn the newly created container, you can see what’s going on:
$ docker exec -it localdistcc htop

If you run htop in the localdistcc container, your container will only run distccd.
Compile a code and distribute it to our localdistcc node. Here I go compiles LLDB with adjustments:
$ git clone https://github.com/llvm/llvm-project.git ~/dev/llvm-project
# Get the IP address of the localdistcc container
$ export LOCAL_DISTCC_IP=$(docker inspect -f 'range .NetworkSettings.Networks.IPAddressend' localdistcc)
$ export DISTCC_HOSTS="$LOCAL_DISTCC_IP/7 localhost"
$ mkdir -p ~/dev/llvm-builds/release-gcc-distcc
$ cd ~/dev/llvm-builds/release-gcc-distcc
$ cmake ~/dev/llvm-project/llvm
  -G Ninja
  -DCMAKE_BUILD_TYPE=Release
  -DLLVM_USE_LINKER=gold
  -DLLVM_ENABLE_PROJECTS="lldb;clang;lld"
  -DCMAKE_C_COMPILER=/usr/bin/gcc
  -DCMAKE_CXX_COMPILER=/usr/bin/g++
  -DCMAKE_EXPORT_COMPILE_COMMANDS=1
  -DCMAKE_C_COMPILER_LAUNCHER="ccache;distcc"
  -DCMAKE_CXX_COMPILER_LAUNCHER="ccache;distcc"
$ ninja lldb -j $(distcc -j)
I marked the sections in bold, which are worth a look. Things to keep in mind are:
Get the IP address of the container in which the distcc container is running docker inspect ,
When exporting DISTCC_HOSTSI suggest you take a look at the /7 because this instructs distcc to distribute seven jobs on this machine. My machine has eight cores, and I do not want the energy going out. By default, only four jobs are sent man distcc):
/ LIMIT A decimal limit can be added to this host specification if that client sends it to the computer. By default, the limit is set to four per host (for local host), but can be further limited by the server. You should only need to increase this for servers with more than two processors.
Generate a build system for ninja with -G Ninja,
We use fully qualified paths to the compilers we want to use by specifying CMAKE_C_COMPILER=/usr/bin/gcc and CMAKE_CXX_COMPILER=/usr/bin/g++ , In the next section, you’ll learn why we do this.
Use CMakes CMAKE__COMPILER_LAUNCHER to call ccache distcc /usr/bin/gcc instead of only /usr/bin/gcc, This is a good mechanism to avoid masquerades gcc gold g++ ,
Masquerading is a technique in which you create a named file gcc and make it available on yours PATH Intercept calls gcc, Strangely, Fedora 29 does this when you install ccache , The package created /usr/lib64/ccache/gcc that indicates /usr/bin/ccache , This effectively masks your local gcc binary with ccache , As a matter of fact, ccache will mask a whole armada of compilers gcc, g++, clang, clang++ (please refer rpm -ql ccache for the complete list). That’s why we use fully qualified paths for compilation /usr/bin/gcc ,
We let discc find out how many build jobs should run at once: -j $(distcc -j) ,
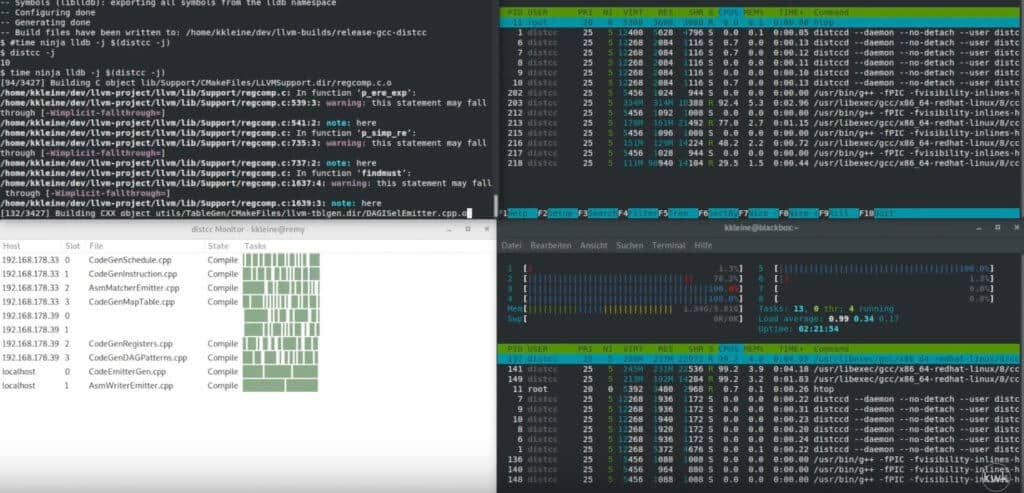
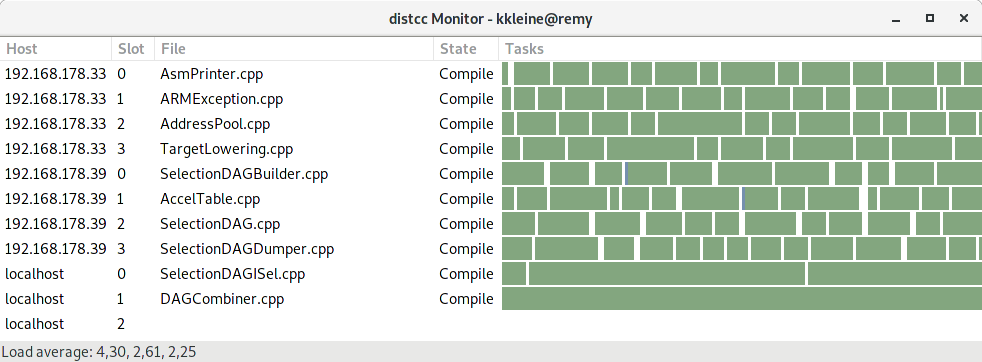
while ninja build, take a look at the distccmon-gnome Output (see section “Troubleshooting”). It should look like this:
distccmon gnome output at local compilation with a distcc container.
NOTE: distcc -j assume that all your hosts are listed in DISTCC_HOSTS are different machines. However, the container runs on your local host and consumes resources. This can affect the performance of your developer computer. When things get slow, just break compilation. This is just for testing anyway.
troubleshooting
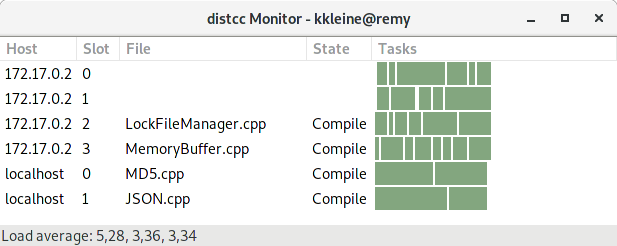
How can I visualize the distribution of the compilation?
On Fedora 29 I use distccmon-gnome gold distccmon-text (see screenshots below). To install them, execute sudo dnf distcc-gnome distcc ,
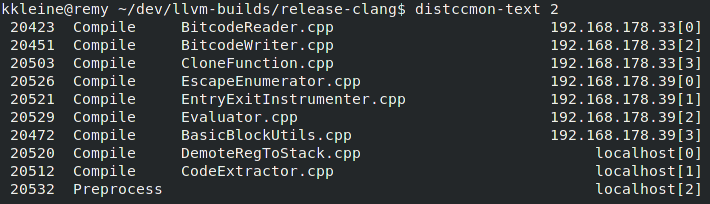
How do I test if all my hosts are using distcc?
Test if all your nodes are using netcat distcc (nc). Replace in the following command 192.168.178.33 192.168.178.39 with the IPs of your hosts. NOTE: I often work in a VPN. Therefore, I use fixed IP addresses to avoid problems with resolving hostnames.
$ for i in 192.168.178.33 192.168.178.39; do nc -zv $i 3632; done
Ncat: Version 7.70 ( https://nmap.org/ncat )
Ncat: Connected to 192.168.178.33:3632.
Ncat: 0 bytes sent, 0 bytes received in 0.01 seconds.
Ncat: Version 7.70 ( https://nmap.org/ncat )
Ncat: Connected to 192.168.178.39:3632.
Ncat: 0 bytes sent, 0 bytes received in 0.01 seconds.
Alternatively, you can use the much slower ones nmap:
$ nmap -A 192.168.178.33/32 -p 3632 -Pn
Starting Nmap 7.70 ( https://nmap.org ) at 2019-04-23 14:05 CEST
Nmap scan report for MyServer (192.168.178.33)
Host is up (0.00069s latency).
PORT     STATE SERVICE VERSION
3632/tcp open  distccd distccd v1 ((GNU) 8.3.1 20190223 (Red Hat 8.3.1-2))
Service detection performed. Please report any incorrect results at https://nmap.org/submit/ .
Nmap done: 1 IP address (1 host up) scanned in 6.68 seconds
How can I specify who can use my distcc container for security reasons?
Please note that the CMD Section in the Dockerfile defines a default value of --allow 0.0.0.0/0 Allow connections from anywhere. I suggest that you adjust this parameter when you run the distcc container:
$ docker run
  -p 3632:3632
  -p 3633:3633
  -d
  konradkleine/distcc:fedora29
  --allow
Do I have to use ccache or can i only use distcc?
You can absolutely only use one or the other, just set it CMAKE_C_COMPILER_LAUNCHER and CMAKE_CXX_COMPILER_LAUNCHER Variables when configuring / generating your project with CMake.
# To use ccache and distcc
-DCMAKE_C_COMPILER_LAUNCHER="ccache;distcc"
-DCMAKE_CXX_COMPILER_LAUNCHER="ccache;distcc"
# To use ccache alone (please note, that no distribution will
# happen if you choose this option.)
-DCMAKE_C_COMPILER_LAUNCHER="ccache"
-DCMAKE_CXX_COMPILER_LAUNCHER="ccache"
# To use distcc alone
-DCMAKE_C_COMPILER_LAUNCHER="distcc"
-DCMAKE_CXX_COMPILER_LAUNCHER="distcc"
How do I send more than 4 jobs to a machine?
In your DISTCC_HOSTS Environment variable, you must adjust the limit, which is set to 4 by default. It is indicated with a /after the host name:
export DISTCC_HOSTS="fasthost/8 slowhost/2 localhost"
How can I tell if ccache works for me?
I suggest you take a look at the issue of ccache --show-stats and inspect the Cache hit rate, For example, the following value is 15.61%, which is better than nothing, I would say.
$ ccache --show-stats
cache directory                     /home/kkleine/.ccache
primary config                      /home/kkleine/.ccache/ccache.conf
secondary config      (readonly)    /etc/ccache.conf
stats zero time                     Wed Apr 17 18:44:31 2019
cache hit (direct)                  1787
cache hit (preprocessed)              21
cache miss                          9774
cache hit rate                     15.61 %
called for link                      584
called for preprocessing              35
compile failed                        12
preprocessor error                   116
unsupported code directive             4
no input file                         19
cleanups performed                     0
files in cache                     25218
cache size                           1.2 GB
max cache size                       5.0 GB
I hope you have read this article and learned something from it. Also, watch the related video.